
Helpers — Crimping
Crimping connectors
How-to guideEvery lead on this machine is made with one of two kinds of crimp, and each needs its own pliers. Which is which, how to read the pliers, and the steps for each.
Tools needed
- Crimping pliers for open-barrel contacts, for the PH, VH and Dupont contacts
- Insulated-terminal crimping pliers, for the butt connectors, receptacles and fork terminals
- Wire strippers
- Multimeter, to check the finished joint
The lead pages each say what to crimp onto what. This page is the one place that says how, so each of them points here.
Two kinds of crimp, two pairs of pliers
Open-barrel contacts are bare metal, the size of a grain of rice or smaller. One end is two sets of small wings, the other end is the pin or the socket. They are the PH contacts (the 2.0 mm (0.079 in) JST housings), the VH contacts (the 3.96 mm (0.156 in) JST housing on the control board's 24 V lead, W1) and the Dupont contacts. You crimp them with pliers made for open-barrel contacts.
Insulated terminals are a metal barrel inside a coloured or clear plastic sleeve: the butt connectors (one wire in each end), the #187 receptacles on the limit switch, and the fork terminals on the PSU pigtails (PJ1 to PJ3). You crimp them with insulated-terminal pliers.
The two pairs are not interchangeable. An insulated terminal in open-barrel pliers is squashed rather than gripped, and an open-barrel contact in insulated-terminal pliers is not closed properly. Each lead page names which pliers each crimp needs.
The words the pages use, once and for all:
- Contact
- The metal piece that goes inside a housing: PH, VH or Dupont. Open barrel.
- Terminal
- Any insulated crimp part. A butt connector is a terminal, so are the receptacle and the fork.
- Die
- The shaped part of the pliers that closes on the crimp. Some pliers call it the jaw; it is the same thing. Pliers usually have several, each marked with the wire size it is for.
Choose the die by its marking
Go by the wire size marked on the die, in AWG or in mm², never by its colour. Colour codes on pliers and on terminals differ between makers, and some pliers have none. If your die gives only mm², use the one that covers your wire. Each lead page gives the size it needs.
Open-barrel contacts
Do one contact at a time. Practise on a scrap of the same wire first: a mis-crimped contact cannot be reused, and the first ones in a series you have not done before often come out wrong.
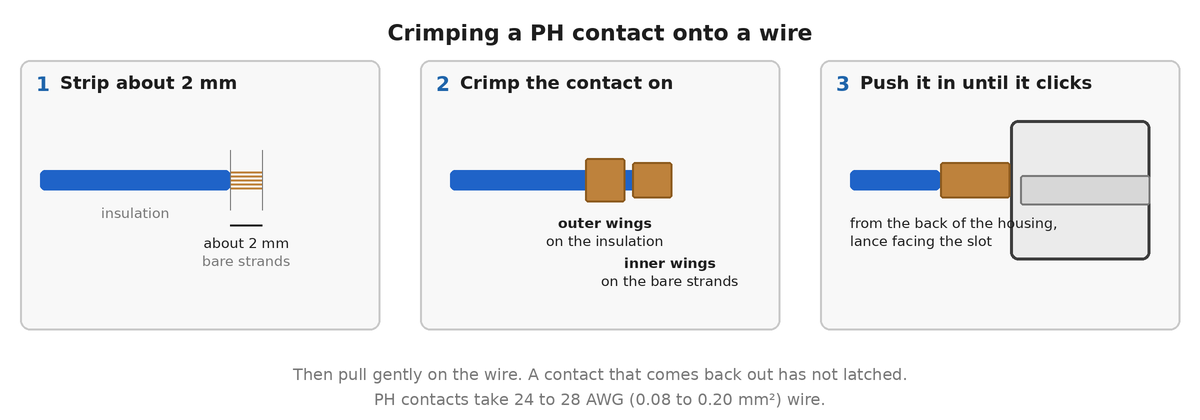
- Strip the end of the wire: about 2 mm (0.08 in) for a PH or Dupont contact, 3 mm (0.12 in) for a VH contact. Twist the strands tight.
- Find the two sets of wings on the contact. The inner wings are the short pair next to the pin or socket, the outer wings are the longer pair at the back.
- Place the bare strands in the inner wings and the wire's insulation in the outer wings. No strands may stick out past the inner wings, and the insulation must not be under them.
- Close the die. The inner wings curl onto the strands and the outer wings onto the insulation.
- Pull on the wire. If it comes out, cut the contact off, strip the wire again and use a new contact.
- Push the contact into the back of the housing until it clicks.
What each one takes:
- PH contact (
SPH-002T): 24 to 28 AWG (0.08 to 0.20 mm²) wire only. Use the 24 AWG (0.20 mm²) die. - Dupont contact: 22 to 28 AWG (0.08 to 0.33 mm²) wire.
- VH contact (
SVH-21T): 22 to 16 AWG (0.33 to 1.3 mm²) wire, so a bigger barrel than the other two and a bigger die.
Insulated terminals
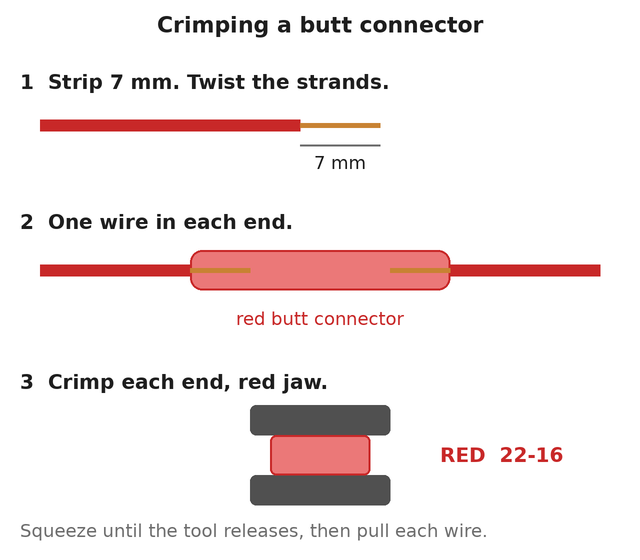
- Strip the wire as long as the metal barrel: about 7 mm (0.28 in) for a butt connector, 5 mm (0.2 in) for a #187 receptacle, as long as the barrel for a fork terminal. Hold the wire against the terminal to judge it. Twist the strands tight.
- Push the bare strands into the barrel until the wire's insulation meets the end of the barrel. On a clear butt connector you can see the strands reach the stop in the middle.
- Put the metal barrel, not the plastic sleeve, in the die marked for your wire size and squeeze. On ratcheting pliers, squeeze until the ratchet releases.
- On a butt connector, crimp each end separately. Do one joint at a time so two joints never touch, and stagger them by a few millimetres along the lead.
- Pull on every wire.
Check every crimp
A crimp you cannot pull out is a crimp that holds. A crimp that holds can still be a bad joint, so the lead pages end with a continuity check on the finished lead. Do that check before the lead goes near the board or the supply: it is what finds a strand crossing to the next contact.