
SorterOS — Operate
First setup in the UI
How-to guideThe setup wizard step by step, from opening the machine's UI in a browser to a machine ready for its first sort run.
AI-generated first draft. Written from the SorterOS UI's own source and from the UI running here, not from setting up a real machine. The screenshots are of steps 1 to 3, step 7 and Settings; steps 4 to 6, 8 and 9 need hardware attached, so their screenshots are still missing and their wording has not been checked against a machine that has boards, servos and cameras on it. Step 7 has been.
The software is installed and the machine has booted. This page takes you from opening its UI in a browser to a machine that is ready to sort. Everything here happens in the browser, so there are no commands to type.
Before you start
- The machine is assembled, wired and powered on.
- SorterOS is installed and running. See Installation.
- The control board is flashed. Step 3 below only lists boards that already answer on USB serial, so a board with no firmware on it does not appear there at all. Software setup step 2 has the route, including the one for a board that has never been flashed.
- Your phone, tablet or computer is on the same network as the machine.
- The machine is empty: no parts in the C-channels, the carousel, the classification chamber or the chute. The wizard turns the motors.
- Nothing is resting against the chute or the carousel.
Set aside about an hour. You can stop between steps and come back later.
Open the UI
Type the machine's address into your browser. Which address depends on how you installed the software:
| Install | Address |
|---|---|
| SorterOS image | http://sorter.local/ |
Generic Linux as a service (install.sh --as-service) | http://<machine name>/ |
Generic Linux with ./dev.sh, or by hand | http://<machine name>:5173/ |
If you gave the machine a different hostname during the install, use that name instead of sorter. If no .local address answers, use the machine's IP address from your router.
There is nothing to log into. The machine UI has no account and no password, so anyone on your network who opens the address sees the same screens you do. The only sign-in on this page is Hive, in step 8, and that is optional.
The first time you open the UI it opens the setup wizard.
If the page does not appear at all, or it appears and every button fails, see SorterOS troubleshooting.
Tell the machine which build it is
The machine has to know which build it is before the wizard checks anything that moves. Open Settings → General → Machine setup and pick the one that matches what you built:
| Setup | What it is |
|---|---|
| C-Channels + Classification Channel | A dedicated classification C-channel in place of the carousel and chamber. |
| FIDA + Carousel + Classification Chamber | C-channel feeding, carousel handoff, chamber classification. |
| Operator-fed carousel | You place each part into the carousel dropzone yourself. |
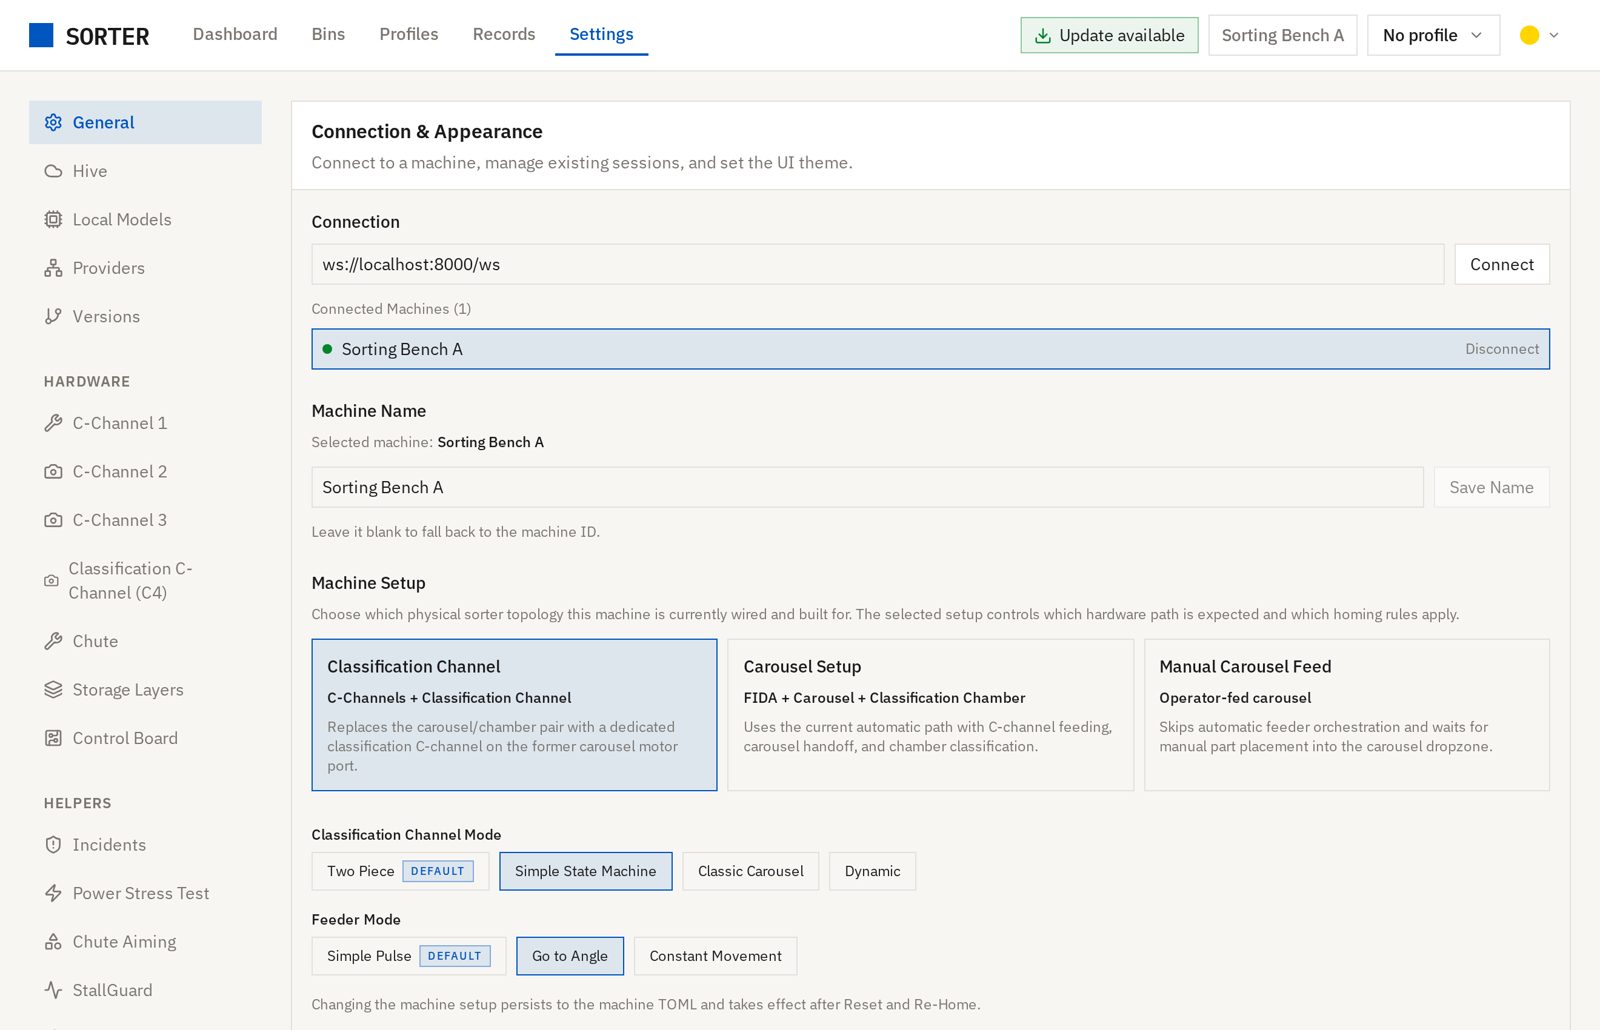
The choice is saved on the machine and decides what the wizard asks you in steps 5 and 7, so set it before you start. Changing it later takes effect after a reset and a re-home.
How the wizard works
- The nine steps run along the top. The one you are on is highlighted.
- Continue at the bottom takes you to the next step. When it is greyed out, the line beside it says what is still missing.
- A step stays locked until the steps before it are done.
- You can close the browser and come back. The wizard remembers how far you got on this machine.
- After you finish, reopen it any time from Settings → Setup Wizard → Open Setup Wizard.
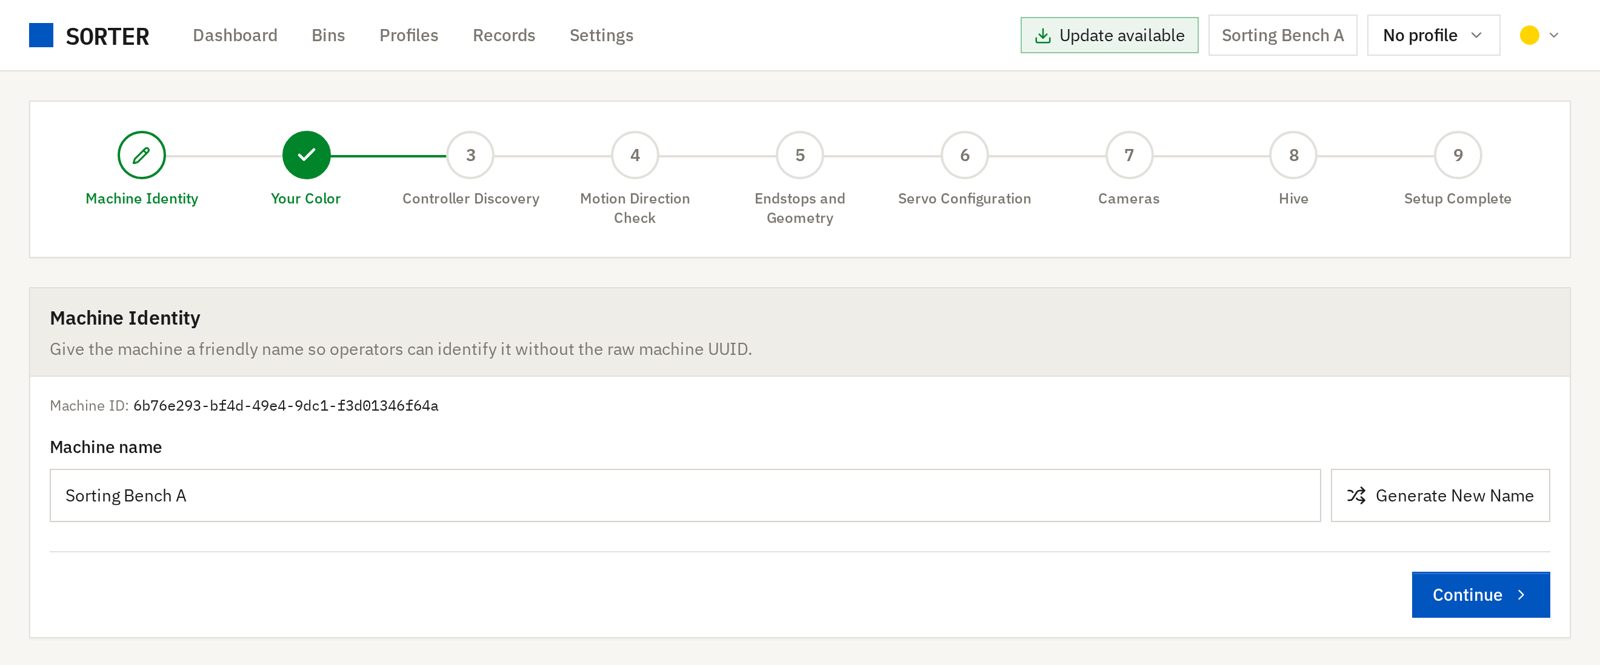
Step 1: Machine identity
Type a name for the machine and press Continue. The name is how the machine appears in the machine picker at the top of the UI, and in Hive if you connect it later.
Generate New Name beside the field invents one for you if you would rather not think of one.
The machine ID above the field is generated by the machine. Leave it as it is.
Continue stays greyed out until the name field has something in it.
Step 2: Your color
Pick a LEGO color. The buttons, highlights and focus rings in the UI switch to it immediately.
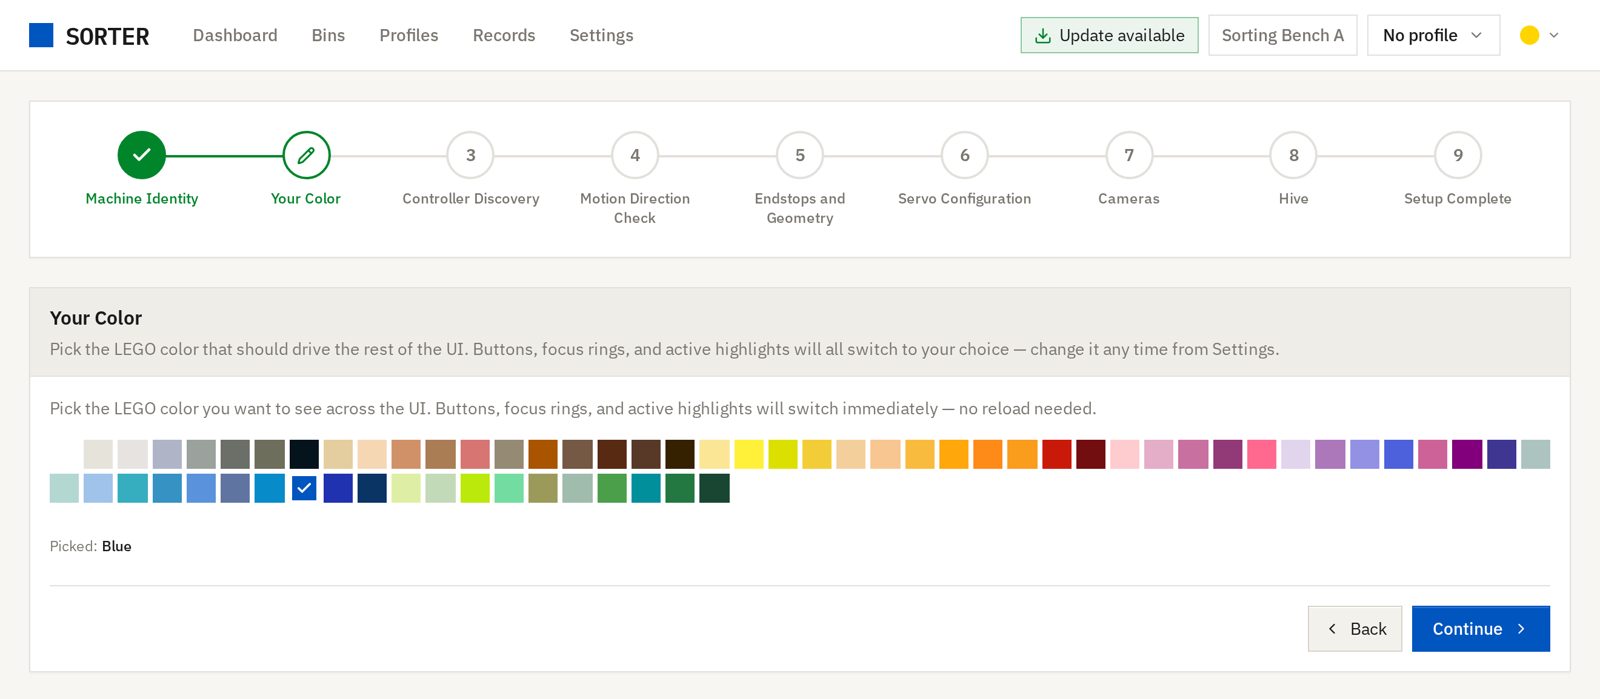
You can change it later under Settings → Connection & Appearance → Theme color.
Step 3: Controller discovery
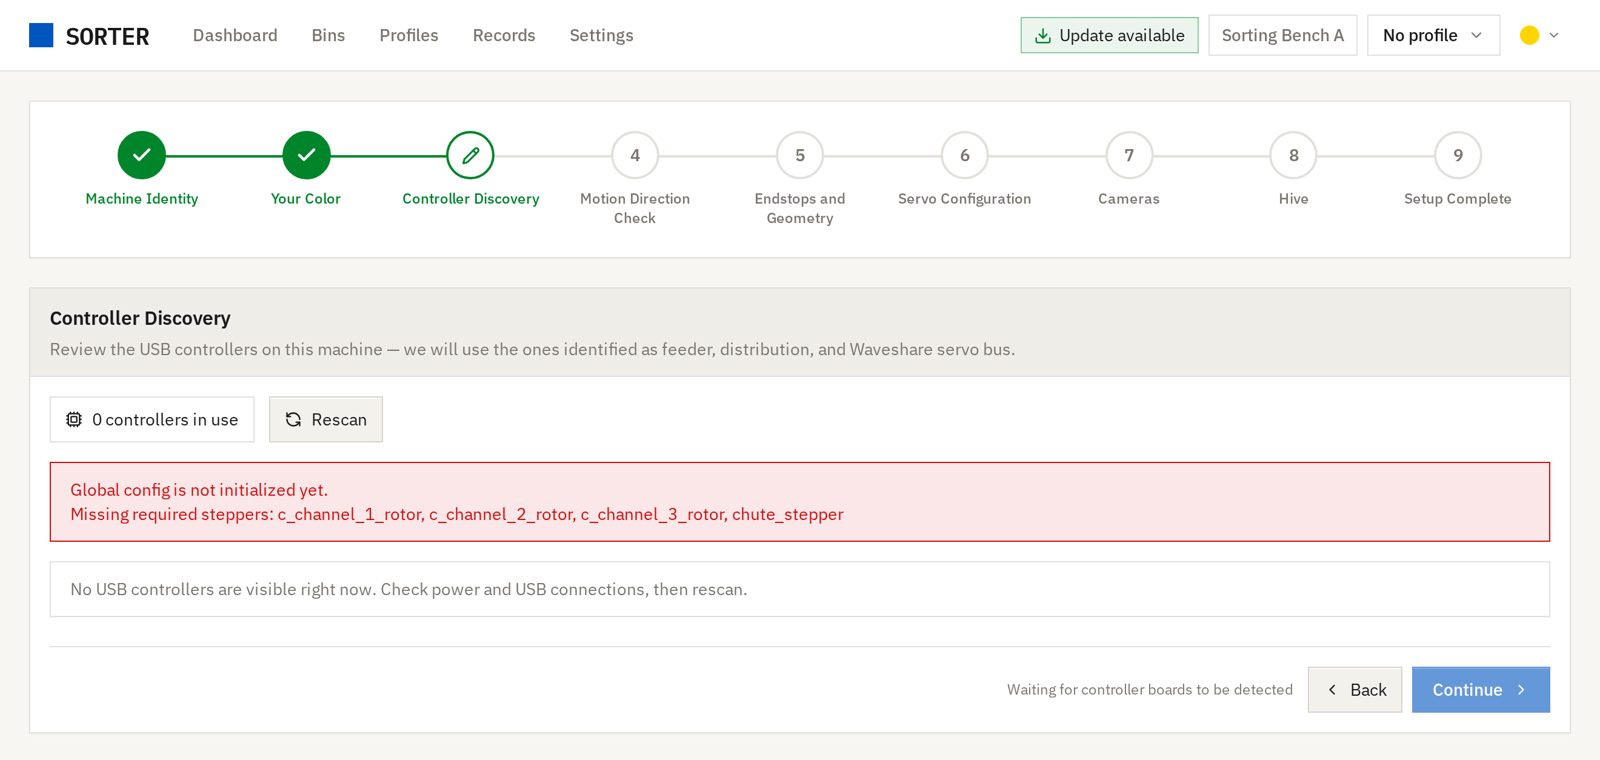
The wizard lists the USB controllers it can see, and uses the ones it recognises. On a machine built from these docs that is two devices:
- the control board, which drives the chute and all four channel rotors,
- the Waveshare servo bus.
A recognised device has a green Controller or Servo Bus badge, its board type, and the port it is on.
Nothing listed, or the control board missing? In order:
- The board has no firmware on it. This is the usual cause on a new machine, and an unflashed board cannot appear here. Flash it, then come back. Software setup step 2.
- The machine is not powered, or the board's USB cable (
U2) is not in. The cable runs from the Pico's own socket to a port on the USB hub. - Press Rescan.
A device badged red Unrecognised is one the machine can see but cannot place: it is on the bus, so the cable and the power are fine.
The wizard's own wording, and the screenshot below, still name a feeder and a distribution board, because the software also supports the older machines that had one of each. On this build the single board reports as the distribution one.
Continue is blocked with "Waiting for controller boards to be detected" until at least one control board is found.
Step 4: Motion direction check
This step turns the motors a little to check which way each one runs. The steppers power on when you open the step: wait for "Powering on steppers…" to clear before you press anything.
One card per axis: C-Channel 1, C-Channel 2, C-Channel 3, the carousel (or the classification channel), and the chute.
- Press Jog on the first card. The axis moves a small amount.
- Look down on it from above, then press Clockwise or Counter-Clockwise to say which way it turned. On a C-channel, watch the rotor, the part the pieces ride on.
- The card turns green and reads Verified. If it turned counter-clockwise, the wizard reverses that motor in software and the card reads Inverted. That is expected: the motor is wired the other way round.
- Repeat for every card.
Show wiring help opens a diagram of the control board and a table of which stepper port each axis uses. Use it if an axis does not move at all.
When every card is verified, press Directions look correct.
Step 5: Endstops and geometry
Each axis that homes has a sensor at its home position. Here you check that the machine reads each sensor the right way round, then let it find home.
- Block the carousel sensor by hand at the home position. The Carousel endstop panel should flip to Triggered.
- If it stays Not triggered, press Trigger state looks inverted? Flip polarity and block the sensor again.
- Do the same for the Chute endstop panel.
- Press Home carousel. The carousel turns until it finds its sensor and stops.
- Press Find chute endstop. The chute does the same. If it runs the wrong way, press Chute moves the wrong way? Flip direction and try again.
- Press Endstops and geometry look correct.
Stop motion on either panel halts that axis at once.
Leave First bin center and Pillar width at the values already in the fields. They are saved when you continue, and you set them properly later, on Homing and calibrating the chute.
A machine built with a classification channel instead of a carousel has no carousel sensor. That panel is replaced by a note, and only the chute is checked here.
Step 6: Servo configuration
The bin doors are driven by servos on one bus, and each servo has to be told which storage layer it belongs to.
The wizard discovers the servos on the bus, then takes them one at a time: calibrate the door, assign it to a layer, move to the next. Work up the machine in the order that suits you, but give every layer a servo.
Continue is blocked with "Configure servos before continuing" until the assignment is complete. When it is, press Servo setup looks correct.
Step 7: Cameras
Every camera the machine needs gets a card here. On a standard machine:
| Area | Needed |
|---|---|
| C-Channel 2 | yes |
| C-Channel 3 | yes |
| Carousel, or Classification C-Channel (C4) | yes |
| Classification Top | optional |
| Classification Bottom | optional |
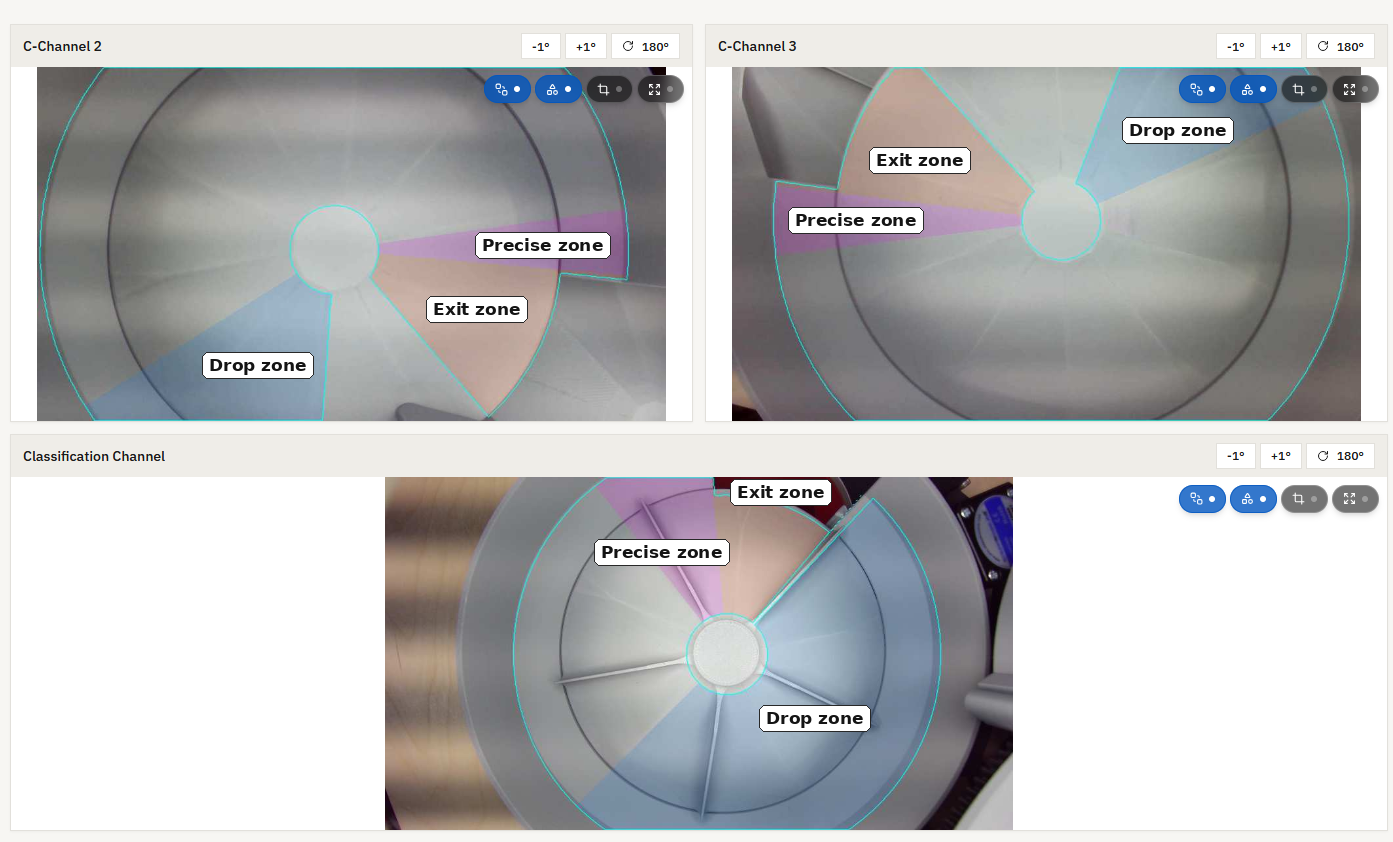
For each card, pick a camera from the dropdown. The card then shows what that camera sees, so you can tell them apart. Both a channel's drop zone and its exit should be visible in the frame. If they are not, you may need to move the camera lamp to a different dovetail on its C-channel. One camera can serve more than one area if its view covers both.
The dovetail on the arm can break when a lamp needs to be removed and repositioned. Use caution if repositioning is needed. The lamps go on at arranging C-channels, step 7, which says which dovetail each one starts in.
Two more buttons on each card: Review zone and Picture tuning, in that order on the card.
Review zone
Use the colored circles to drag the center, the inner and the outer. Then use the colored rectangles to set the drop start and drop end, the exit end, and the precise end and exit start, which are linked and move together. Finally, use the red circle to set the exit outer. Click Save Zone.
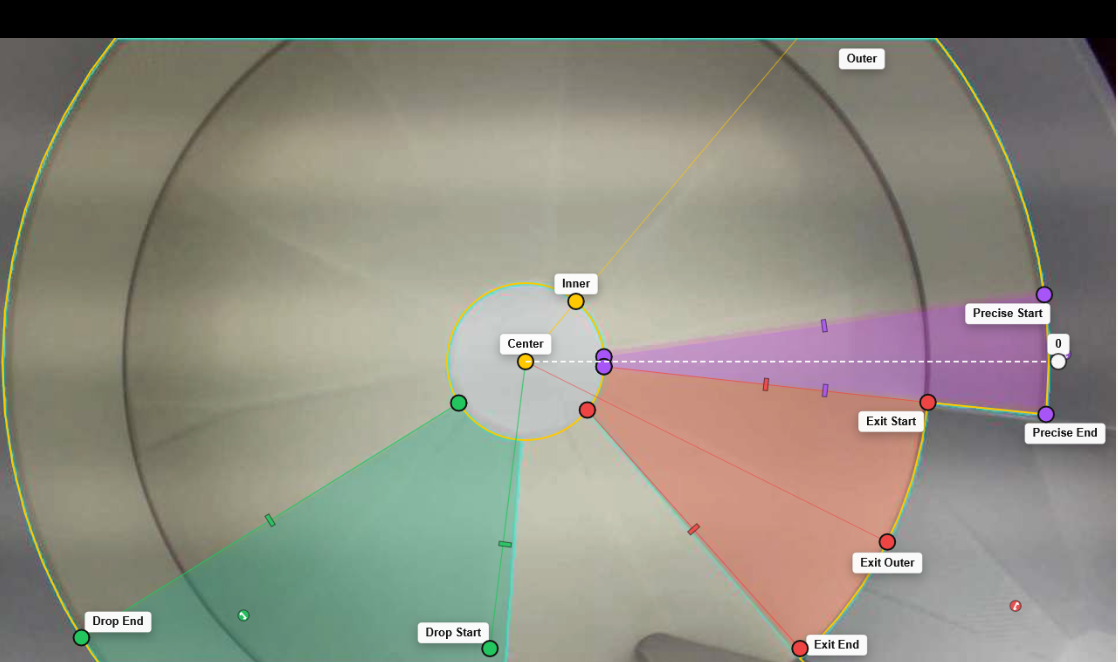
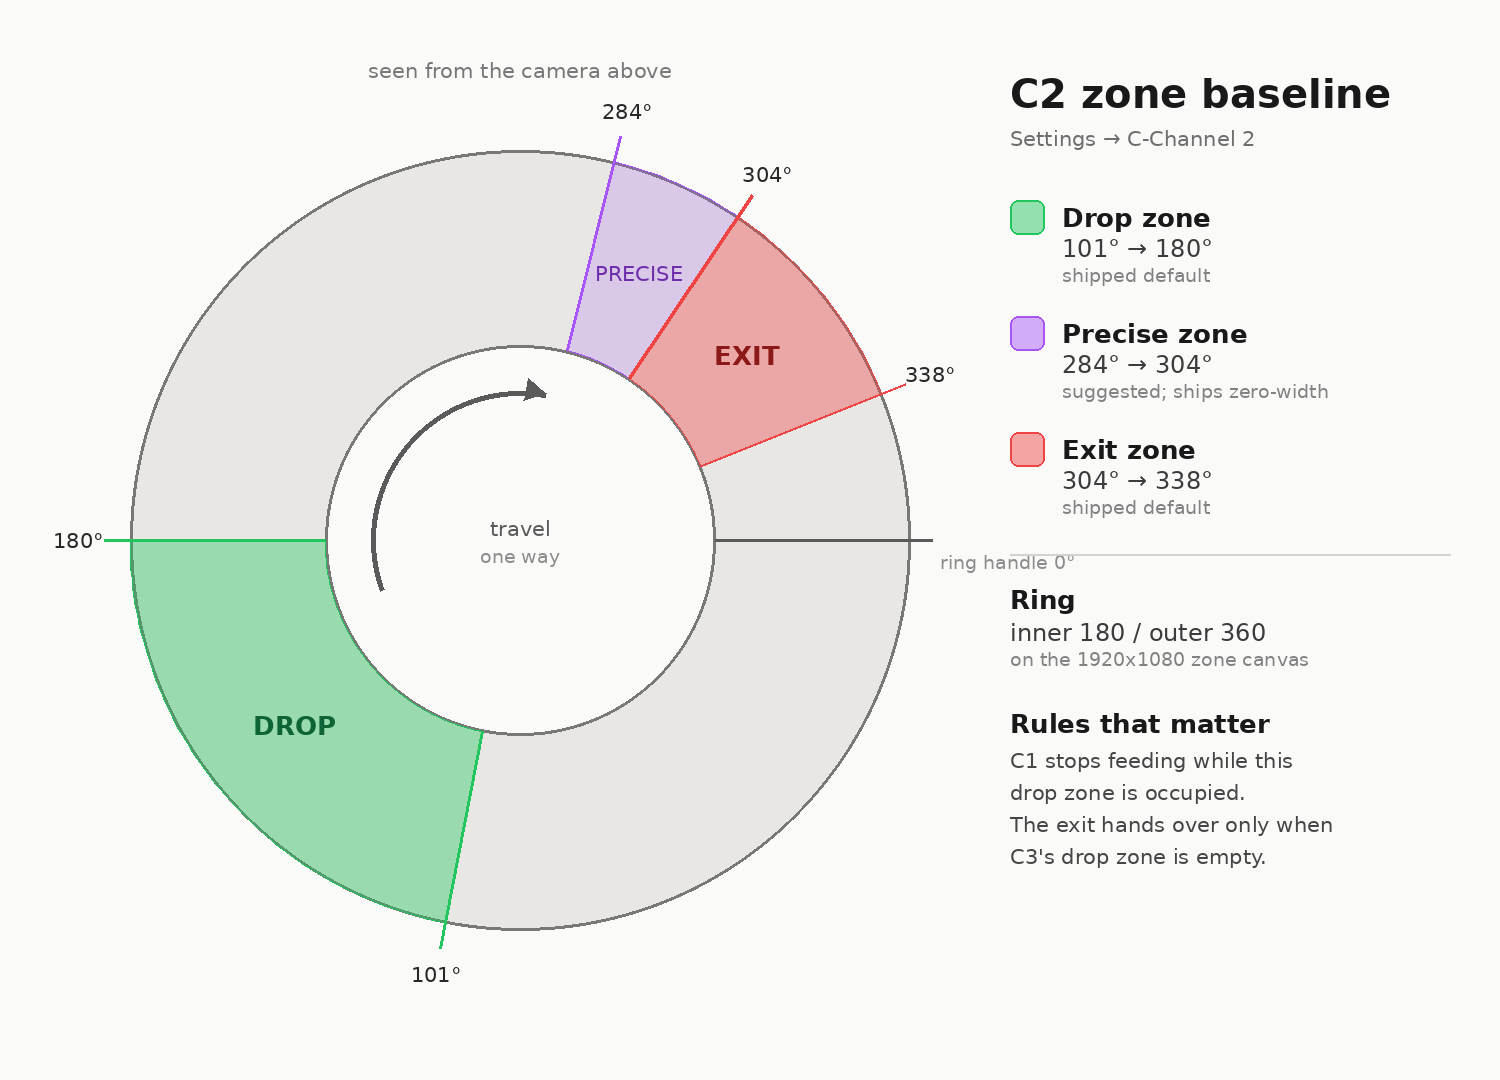
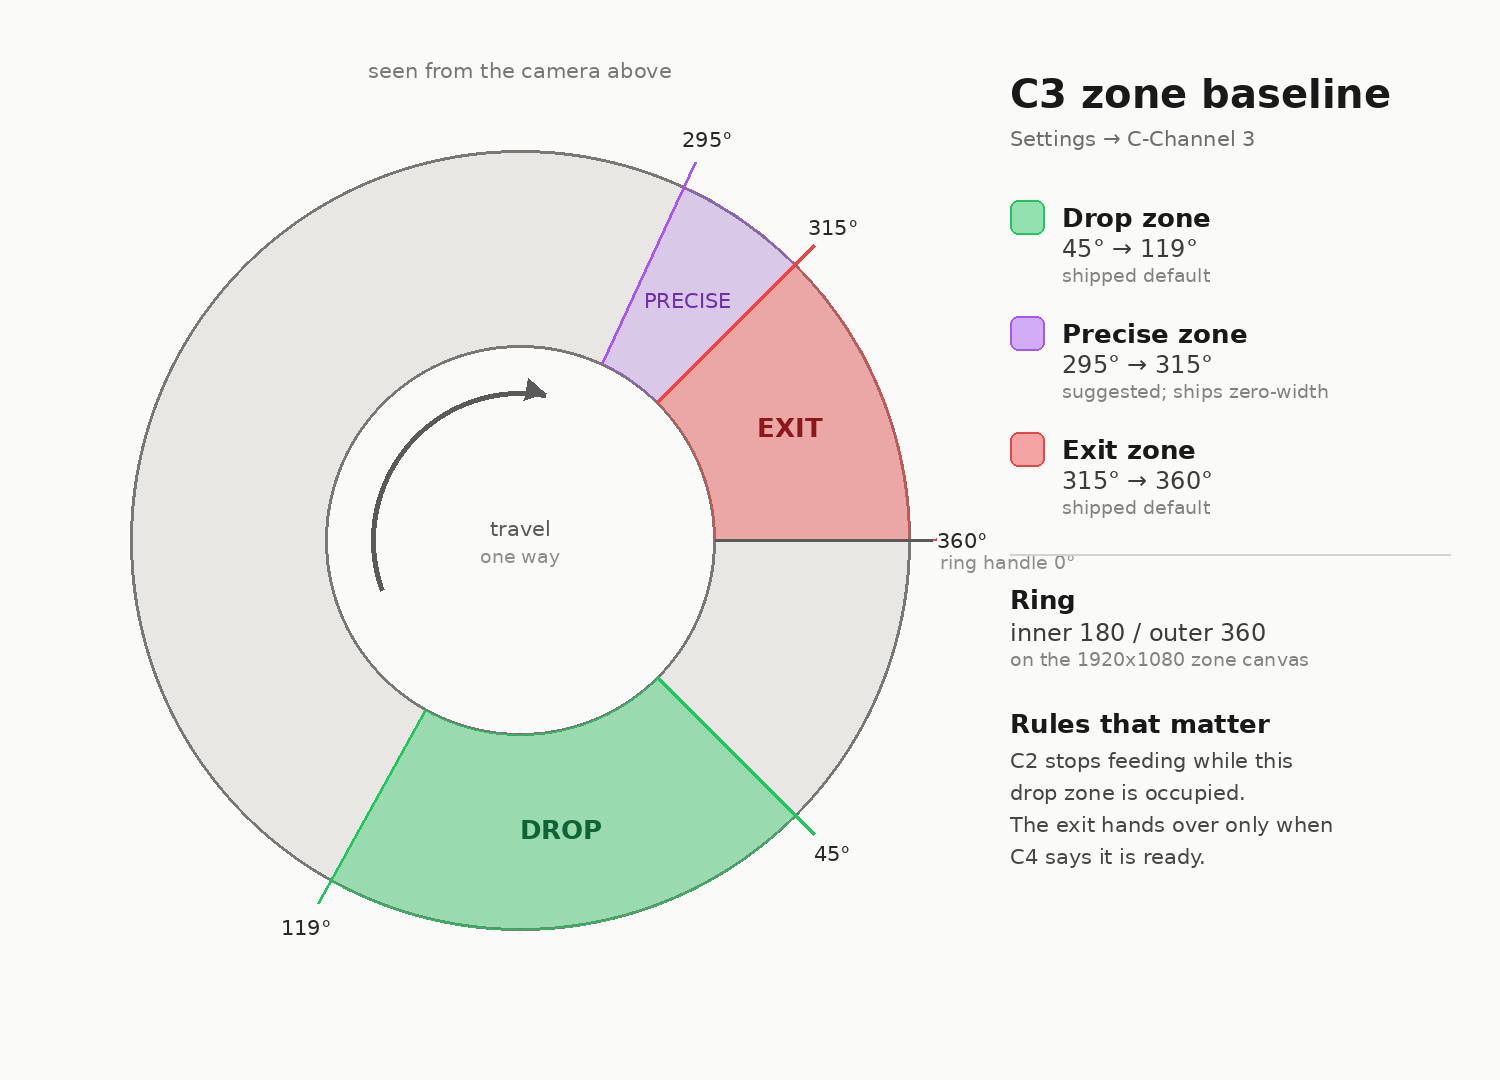
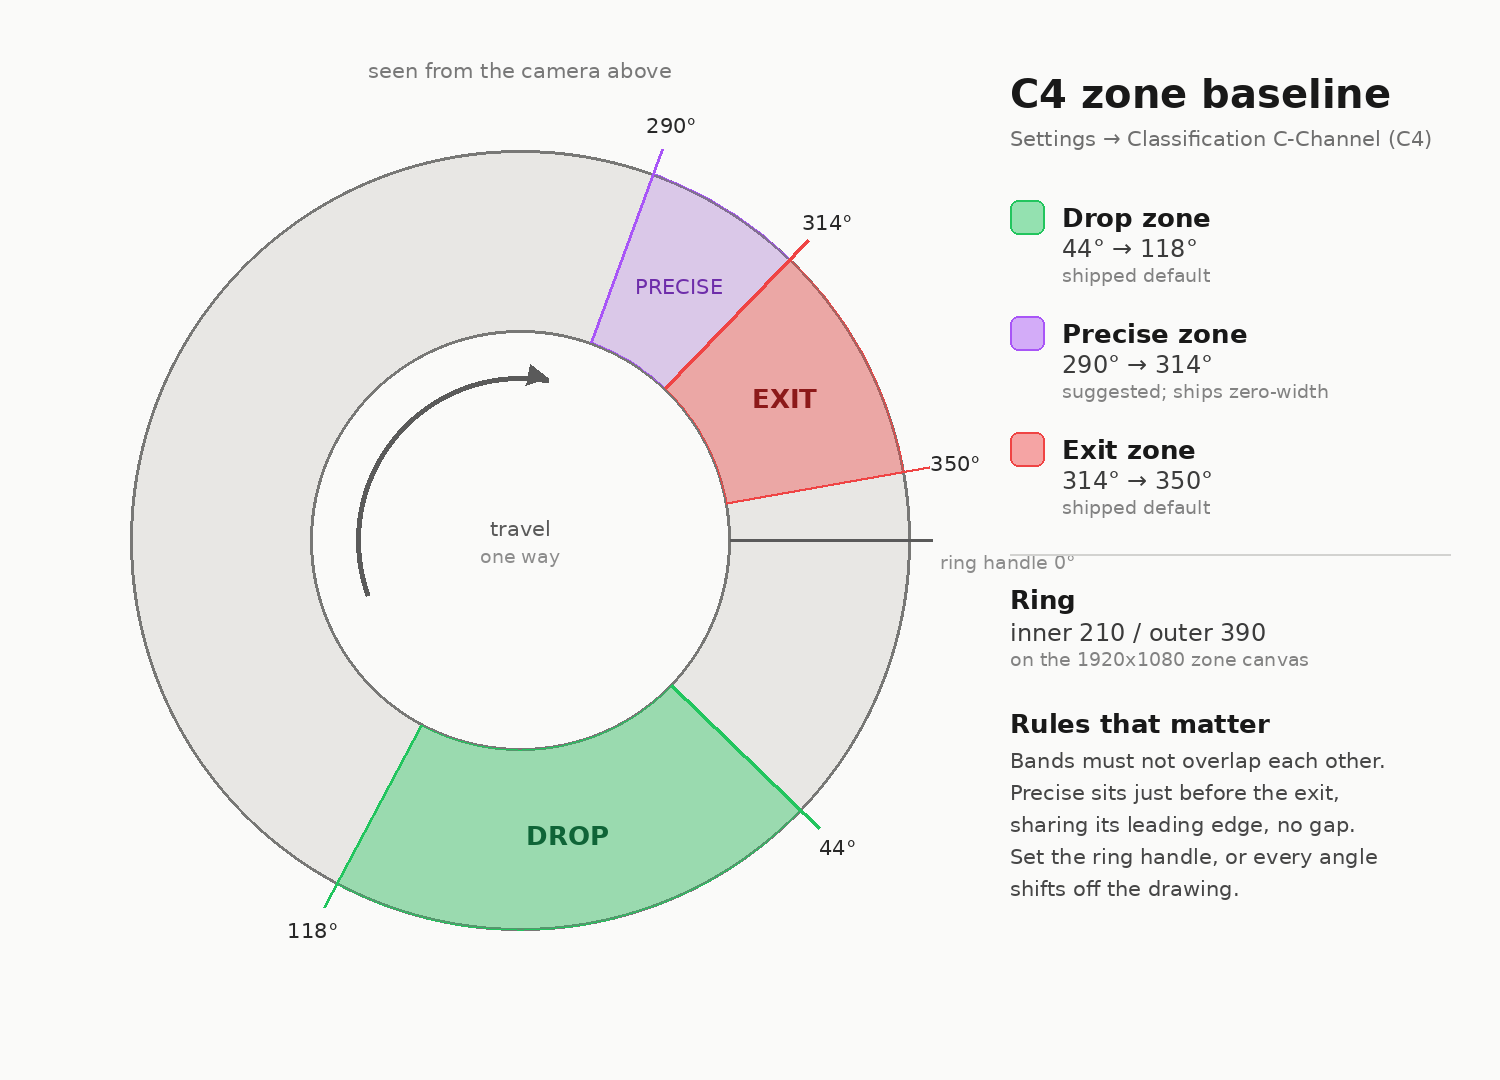
The angles each channel ships with are below. They are drawn against a generic view of the channel, so treat them as a starting geometry rather than a calibration for your machine.
Picture tuning
Color correction is not a manual setting at the moment, but it is worth visiting Camera calibration to get each camera's focus nice and sharp.
Set the mode on each camera:
| Camera | Mode |
|---|---|
| C-Channel 2 and C-Channel 3 | 1280x720 at 30 fps |
| Classification C-Channel (C4) | 3840x2160 at 30 fps |
On all C-Channels, set Pixel Format to MJPG.
The camera's automatic settings should be enough for everything else, and manual settings are there if you need them. Click Confirm.
Press Save Camera Setup when every required area has a camera.
Step 8: Hive
Hive is the community platform. Connecting the machine to it syncs your samples and progress.
- Continue on Hive opens Hive in the browser. Sign in there, or create an account, and confirm the machine name. Hive brings you back to the wizard and finishes the link. No password is stored on the machine.
- Skip for now moves on without it. You can connect later under Settings → Hive.
Step 9: Setup complete
Press Open Dashboard. The wizard is done.
The finished result
The dashboard, with every camera live and the machine in standby.
Settings worth a look
Open Settings from the top of the UI.
Everything on this list is on the General page, which is the one Settings opens on.
- Machine name is the same name you set in step 1.
- WiFi joins the machine to a wireless network, and Tailscale to a Tailscale one. Useful if the machine is on Ethernet now and you want it elsewhere later.
- OpenRouter takes an API key for cloud-assisted detection. It is optional. Identifying a piece does not need it.
- Sample Capture and Local Samples control what the machine keeps from each run. The defaults are fine to start with.
- Theme switches the UI between light and dark, and Theme color is the color you picked in step 2.
Before your first sort run
Five things are left, in this order:
- Camera calibration: focus each camera against a printed chart.
- Homing and calibrating the chute: teach the chute where the bins are.
- Before your first sort run: the last five settings to check, the detection model among them.
- Preparing LEGO for a sort run: what to take out of a tub of bulk LEGO before it goes in.
- Your first sort run: pick a profile, feed a handful of parts, watch them land.